A kitchen hood filter replacement schedule is a documented cadence for inspecting, rotating, exchanging, and replacing your baffle filters based on cooking volume, menu, and code requirements. For most commercial kitchens, inspect weekly and replace or exchange every 1–4 weeks. High‑volume fry or grill lines typically swap filters weekly and document dates, staff, and proof of service.
By Robinhood Cleaners — NFPA 96–certified, WSIB‑insured. Last updated: 2026-04-13.
Above the Fold: Why This Guide Matters + Table of Contents
Create a kitchen hood filter replacement schedule to reduce fire risk, keep airflow strong, and stay inspection‑ready. This guide shows what a schedule is, why it matters, and exactly how to build one that fits your Ontario operation—step‑by‑step with checklists, examples, and templates.
- What is a kitchen hood filter replacement schedule?
- Why scheduling filters reduces fires and downtime
- How to build a schedule step‑by‑step (with templates)
- Filter types and replacement intervals
- Best practices, compliance, and documentation
- Tools, resources, and inspection tips
- Ontario‑specific operational advice
- Mini case studies from All Over Ontario operations
- FAQ and quick reference table
Quick Answer
The best kitchen hood filter replacement schedule for busy restaurants in All Over Ontario is weekly to biweekly swaps with documented inspections every 7 days. Robinhood Cleaners supports this through Filter Cleaning & Exchange, 24/7 scheduling, and NFPA 96–compliant records that keep you audit‑ready.
Summary
Most commercial kitchens should inspect hood filters weekly and replace or exchange them every 1–4 weeks. Build a route that matches volume and menu, tag filters by zone, and log every change. This keeps grease out of ducts, stabilizes airflow, and aligns with NFPA 96 maintenance expectations.
- High‑volume fry/grill: weekly exchange; document and photo‑log.
- Moderate a la carte: every 2 weeks; tighten to weekly during peak seasons.
- Low‑volume/commissary: every 3–4 weeks with weekly inspection.
- Always maintain spares equal to 1.5–2.0x your installed filter count.
- Record keeper: name, date, shift, zone, pressure or airflow notes.
What Is a Kitchen Hood Filter Replacement Schedule?
A kitchen hood filter replacement schedule is a written plan that defines when filters are inspected, cleaned, rotated, or replaced by zone. It adapts to cooking volume and menu, aligns with NFPA 96 maintenance, and ensures proof for insurers, landlords, and health/fire inspectors.
Plain‑English Definition
- Scope: Includes inspection, cleaning/exchange, replacement, labeling, and recordkeeping.
- Triggers: Days on hood, visible grease load, airflow drop, or odor/smoke cues.
- Outcome: Consistent airflow, less grease migration, and easier pass on inspections.
How It Fits Within Exhaust Maintenance
- Filters are first defense: They trap grease before it reaches hoods, ducts, and fans.
- Downstream impact: Clean filters reduce duct cleaning frequency and keep fans balanced.
- Compliance alignment: NFPA 96 expects systems to be maintained to prevent grease accumulation.
What Most Teams Miss
- Zone variance: Filters over fryers load twice as fast as over steamers.
- Swap logistics: Missing spare sets creates skipped exchanges at peak times.
- Documentation: Lack of logs can complicate insurance claims after an incident.
SCU: A hood filter schedule assigns set intervals (weekly to monthly) to inspect and swap baffle filters by cooking zone. It uses labels, spare sets, and simple logs to keep airflow consistent and grease out of ducts. This provides a defensible maintenance record for audits and insurance reviews.
Why a Replacement Schedule Matters (Safety, Airflow, Compliance)
Replacing hood filters on schedule limits grease ignition risk, stabilizes airflow for better capture, and supports inspection readiness. Documented routines prove due diligence to insurers and AHJs, helping avoid shutdowns or penalties during surprise inspections.
Fire Risk Reduction
- Ignition control: Grease‑saturated filters are combustible near open flames and high BTUs.
- Containment: Cleaner filters prevent aerosolized grease from migrating into ducts.
- Example: In our Southern Ontario routes, weekly swaps on high‑output grills reduced visible flareups and smoke complaints within two weeks.
Air Quality and Capture Efficiency
- Stable airflow: Clean baffles maintain static pressure, improving hood capture.
- Fewer odors: Regular exchanges reduce lingering smoke and VOCs near service windows.
- Measurable cue: Many sites see steadier makeup air balance after 2–3 disciplined cycles.
Compliance, Insurance, and Documentation
- NFPA 96 alignment: Maintenance records support “grease accumulation prevention.”
- Insurance readiness: Logs, timestamps, and before/after photos aid claims handling.
- Inspector trust: Clear binders at the service desk speed walk‑throughs.
SCU: A consistent filter exchange program reduces fires and odors while demonstrating maintenance diligence. When Ontario inspectors ask for proof, dated logs and photos from your weekly or biweekly swaps show your team prevents grease accumulation, which keeps kitchens open and staff safer.
How a Kitchen Hood Filter Replacement Schedule Works
Successful programs pair weekly inspections with zone‑based swaps, labeled spares, and simple logs. High‑grease zones change weekly; lighter zones biweekly to monthly. Teams track dates, initials, airflow notes, and photos. Vendors like Robinhood Cleaners provide exchange carts and 24/7 pickups.
Core Elements
- Zone map: Label hoods by station (Fry 1–2, Grill, Wok, Prep) with filter counts and sizes.
- Intervals: Weekly (heavy), biweekly (moderate), monthly (light), with seasonal adjustments.
- Inventory: Spare set count = 1.5–2.0x installed filters to avoid gaps.
- Records: Date, shift, initials, zone, comments; photo log for heavy loads.
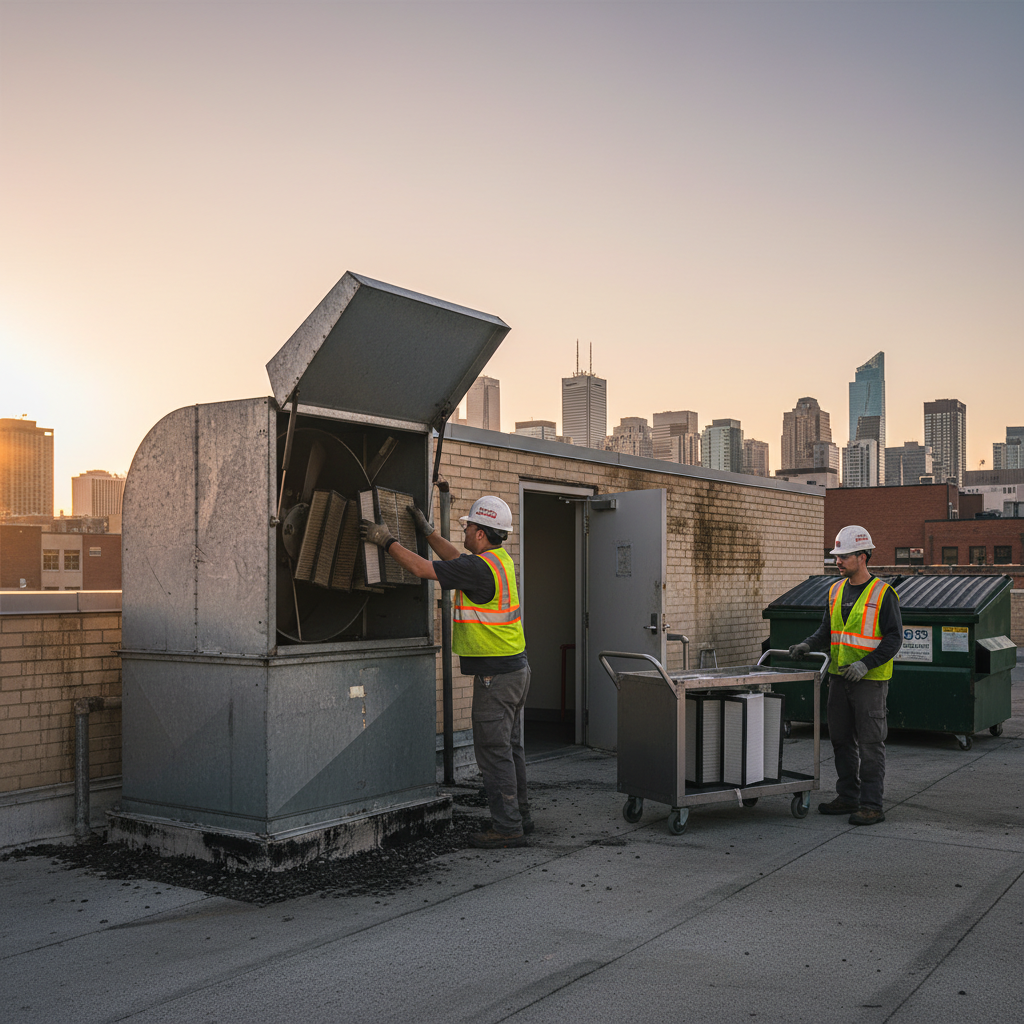
Step‑by‑Step Exchange (10 Minutes per Bank)
- Stage labeled clean filters on a rolling cart; check sizes (e.g., 16×20, 20×20 baffles).
- Lockout tagout if needed; set a safe ladder; wear cut‑resistant gloves and PPE.
- Remove hot filters with both hands; drain briefly in a catch pan.
- Insert clean baffles with vertical fins and arrow indicating airflow; ensure snug fit.
- Wipe hood rails; snap a photo of installed set for the log.
- Tag dirty filters for wash or exchange pickup.
Documentation & Audit Trail
- Log binder or app: One page per zone per week; attach photos.
- Color tags: Use simple color rotation to signal the week number on each filter.
- Vendor receipts: Keep Robinhood Cleaners’ NFPA 96 service reports with logs.
SCU: The schedule combines a zone map, preset intervals, spare inventory, and a quick swap procedure. Staff complete a log with photos and vendor receipts, creating an auditable record. This keeps operations flowing and gives managers defensible proof of maintenance.
Types of Hood Filters and Recommended Intervals
Most commercial sites use stainless steel baffle filters; they’re durable and UL listed. Mesh filters clog faster and are for light duty. Disposable pads serve specialty or temporary setups. Replace or exchange baffles weekly to monthly by zone—with fryers and charbroilers on the shortest cycle.
| Filter Type | Typical Use | Pros | Watch‑outs | Suggested Interval |
|---|---|---|---|---|
| Stainless baffle (UL‑listed) | Most line hoods | Durable, dishwasher safe, strong grease removal | Heavier; must seat correctly | Weekly (fry/grill), biweekly (a la carte), monthly (light) |
| Aluminum baffle | Light to moderate duty | Lighter weight, budget‑friendly | Softer metal, dents easier | Weekly to biweekly depending on load |
| Mesh (non‑baffle) | Light grease or specialty | Low initial weight | Clogs quickly; not for heavy fry | Weekly and visual checks mid‑week |
| Disposable pads/screens | Temporary, pop‑ups, events | Simple changeout | Ongoing replacement waste | Daily to weekly; depends on use |
Right‑Sizing by Zone
- Fryers & charbroilers: Highest aerosolized grease—shortest cycle.
- Wok lines: High heat; add mid‑cycle inspections.
- Ovens/steamers: Longer intervals but keep weekly checks.
Fit and Labeling Details
- Standard sizes: 16×16, 16×20, 20×20 inches are common across Ontario kitchens.
- Orientation: Vertical baffles; arrow with airflow; consistent left‑to‑right seating.
- Labeling: Zone and week color tag placed at lower corner for visibility.
SCU: Choose UL‑listed baffle filters for most line hoods and adjust intervals by station. Fryers run weekly, mixed a la carte biweekly, and light prep monthly—always paired with a weekly inspection pass to catch spikes in grease load.
Best Practices for a Reliable Filter Program
Standardize intervals by zone, maintain 1.5–2.0x spare sets, train staff on correct seating, and document every swap. Use photo logs and simple tags. Partner with a certified vendor for exchange and deep cleaning to stay compliant and inspection‑ready year‑round.
Scheduling & Cadence
- Weekly rhythm: Set a fixed swap day (e.g., Monday 9 a.m.) per zone.
- Seasonal tweaks: Tighten cycles during patios and holidays.
- After incidents: Any flareup prompts immediate inspection and swap.
People & Training
- Two‑person rule: One handles hot filters; one stages clean set and logs.
- Seating check: Mis‑seated baffles create bypass paths for grease.
- Refresher micro‑trainings: 10 minutes monthly keeps technique sharp.
Documentation & Proof
- Binder + QR folder: Paper log at the line; digital photo folder by week.
- Vendor reports: Keep service frequency reports in the binder.
- Spot audits: Manager reviews two random zones weekly.
SCU: A dependable program sets a fixed weekly routine, builds spare capacity to avoid skipped swaps, trains two staff per shift, and logs with photos. This combination withstands turnover and busy seasons without sacrificing safety or airflow.
Tools and Resources You’ll Use
You need labeled spare filters, a rolling exchange cart, PPE, ladders, color tags, and a simple log template. A vendor partner provides deep cleaning, exchange pickups, and NFPA 96 documentation so managers can focus on service while staying compliant.
On‑Site Tools
- Spare baffle sets sized for each zone (1.5–2.0x installed count)
- Rolling exchange cart with catch pan and microfiber wipes
- Cut‑resistant gloves, goggles, and slip‑resistant shoes
- Step ladder or platform with rubber feet
- Color tags and a waterproof marker
- Printed log sheets in a binder near the line
Vendor Support from Robinhood Cleaners
- Filter Cleaning & Exchange: We swap, clean, and return labeled sets on schedule.
- Kitchen Exhaust Cleaning: Hood, duct, and fan degreasing for fire hazard reduction.
- Ventilation System Maintenance: Airflow checks and exhaust fan cleaning.
- 24/7 availability: Service windows that won’t disrupt dinner rush.
- WSIB insured: Safety‑first operations and risk coverage for your site.
Templates and References
- Weekly filter log template (zones, dates, initials, photo reference)
- Zone map sheet (filter sizes, counts, and seating direction)
- Exchange pickup ticket (quantity, condition, timestamp)
- See our primer on kitchen exhaust schedules for additional context.
SCU: Stock the basics (spares, cart, PPE, tags, logs) and coordinate with a certified exchange partner. This light kit plus professional service keeps your schedule on track without adding complexity to busy shifts.
Step‑by‑Step: Build Your Kitchen Hood Filter Replacement Schedule
Map your zones, set baseline intervals by menu, calculate spare sets, and lock a weekly swap window. Train two staff, prepare a log, and run a 4‑week pilot. Tune intervals based on grease load and airflow notes, then formalize the SOP with vendor pickups.
1) Map Zones and Sizes (30 minutes)
- List every hood station; count installed filters; note sizes (e.g., 16×20).
- Assign labels: Fry‑1, Fry‑2, Grill, Wok, Prep, Bakery.
- Take a quick photo of each bank for your binder.
2) Set Baseline Intervals
- Fryers/charbroilers: weekly swaps.
- Mixed grill/a la carte: every two weeks.
- Light or seasonal: three to four weeks, but inspect weekly.
3) Secure Spare Inventory
- Spare sets = installed count × 1.5–2.0 (round up to full sets).
- Label each spare set to its zone to prevent mix‑ups.
4) Choose the Swap Window
- Pick a consistent day/time when grills are cool and staff are available.
- Coordinate with our filter replacement schedule guide for vendor pickup timing.
5) Train, Pilot, and Tune
- Run a 4‑week pilot; record grease levels and any smoke/odor notes.
- Shorten intervals where photos show heavy load or airflow drops.
- Lock SOP; keep a laminated quick‑steps card on the cart.
SCU: In a single shift you can draft a working schedule: map zones, set intervals, buy spares, pick a swap time, and pilot for four weeks. Adjust based on photo evidence and airflow observations, then finalize your SOP and vendor cadence.
Ontario‑Ready Operations: Local Tips That Save Time
Plan around Southern Ontario rush hours, patio seasons, and winter closures. Use overnight or early‑morning windows to avoid service impacts. Keep rooftop access clear in snow and schedule exchanges before long weekends when demand spikes.
Local Tips
- Tip 1: If your site is near highway corridors or event venues, lock your swap window outside pre‑game and commuter rush to keep loading zones clear.
- Tip 2: In winter, clear rooftop access before morning exchanges; icy ladders delay swaps and risk injuries.
- Tip 3: Before long weekends and patio season, tighten intervals one notch for fry and grill zones to handle volume surges.
IMPORTANT: These tips reflect how Ontario kitchens operate at varying volumes while maintaining compliance and safety.
Case Studies and Real‑World Examples
Weekly swaps on high‑output stations, combined with photo logs, reduced smoke complaints and stabilized airflow across Ontario sites. Teams that labeled spares by zone cut missed exchanges to near zero and passed routine inspections with no remedial notes.
Quick Service Burger Line (Southern Ontario)
- Problem: Frequent smoke at pickup window during dinner rush.
- Action: Weekly fryer/grill swaps; biweekly on light stations; photo‑log binder.
- Result: Noticeable drop in smoke within two weeks; smoother inspector visits.
Institutional Kitchen (All Over Ontario)
- Problem: Inconsistent airflow readings noted by maintenance.
- Action: Standardized biweekly swaps and added mid‑cycle inspections on wok line.
- Result: Stabilized makeup air balance; fewer odor complaints in adjacent corridors.
Downtown Bistro (Seasonal Patio)
- Problem: Grease load spikes during patio season overwhelmed the prior monthly cadence.
- Action: Shifted to weekly swaps May–September; maintained biweekly off‑season.
- Result: Consistent capture and cleaner hood rails despite surge volume.
SCU: Sites that move to weekly fryer/grill swaps and keep a simple photo‑log consistently report steadier airflow, fewer odors, and better inspector feedback across busy Ontario service periods.
Common Mistakes and How to Avoid Them
Avoid skipping spares, mis‑seating baffles, and running one interval across all zones. Use a two‑person swap, label by zone, and tighten intervals for fry/grill. Keep a binder and vendor reports together to sail through audits.
Mistake 1: One‑Size‑Fits‑All Intervals
- Fix: Shorten for fry/grill; extend only for light stations after photo review.
- Why: Aerosolized grease varies by station; treating them the same leads to clogs.
Mistake 2: No Spare Sets on Site
- Fix: Maintain 1.5–2.0x spare count; label and stage on a cart.
- Why: Spares prevent skipped exchanges during peak hours.
Mistake 3: Poor Documentation
- Fix: One log per zone per week; attach photos and vendor receipts.
- Why: Documentation proves due diligence to inspectors and insurers.
SCU: The reliable program is simple: spares on site, zone‑specific intervals, correct seating, and a log with photos. These four habits eliminate most filter issues we see during Ontario walk‑throughs.
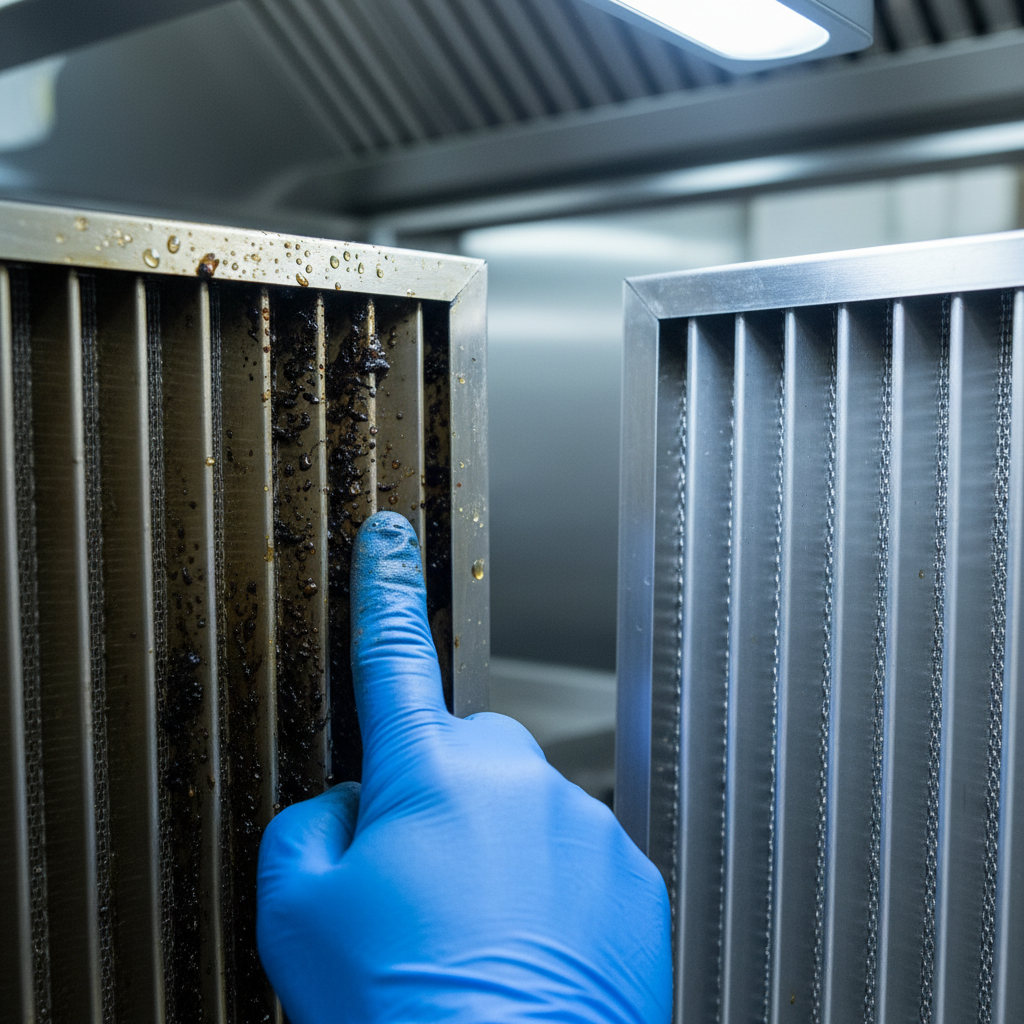
Inspection Cues: How to Know It’s Time to Swap
If you see pooling grease, stained fins, reduced capture at the hood edge, or hear fans laboring, it’s time to swap. Weekly visual checks plus airflow notes keep you ahead of clogs and flareups.
Visual Indicators
- Brown/black staining across multiple baffles in a bank
- Grease sheen or drip lines on lower edges
- Visible smoke roll‑out at hood lip during sear/fry
Performance Indicators
- Fan noise spikes or rattling that wasn’t present last week
- Odor lingering longer near pickup windows
- Uneven draw across the bank—edges pulling, center not
Operational Triggers
- Menu changes that add fry/grill volume
- Seasonal patio increases in overall throughput
- Post‑incident checks after any flame event
SCU: Use weekly walk‑throughs to spot discoloration, drips, smoke roll‑out, or fan strain. Any two cues in the same week mean swap immediately, then review whether the zone needs a tighter baseline interval.
Documentation: Logs, Photos, and Compliance Evidence
Keep a weekly zone log with dates, initials, and simple notes. Attach photos of filters before and after swaps. File vendor receipts and frequency guidance in the same binder to show a complete, compliant maintenance story at a glance.
What to Capture
- Date, time, zone, staff initials
- Grease load note (light/moderate/heavy)
- Any airflow or odor observation
- Photo of installed clean bank each swap
How to Store
- Binder at the service desk; QR link to a cloud folder
- Weekly dividers by zone; vendor reports clipped behind
- Retain at least 12 months of records
Where This Helps
- Surprise inspections
- Insurance claims after incidents
- Lease or franchise compliance reviews
SCU: A tidy binder plus a photo folder is inexpensive and powerful. Inspectors can confirm diligence in seconds, and managers can diagnose airflow issues across weeks without guesswork.
When to Bring in a Professional Partner
Use a certified partner when you need routine exchanges at scale, deep cleaning of hoods/ducts/fans, inspection documentation, or 24/7 windows that won’t disrupt service. Professional teams keep your records complete and your system compliant.
Signals You’ve Outgrown DIY
- Multiple hoods or satellite kitchens with overlapping swaps
- Rooftop fan access or hinge kits requiring trained techs
- Recurring smoke or odor complaints despite regular swaps
What Robinhood Cleaners Provides
- Filter Cleaning & Exchange with labeled rotation
- Kitchen Exhaust Cleaning (hoods, ducts, fans)
- Ventilation System Maintenance and exhaust fan cleaning
- WSIB insured, NFPA 96 certified, 24/7 scheduling
Helpful Reading
- See our primer for Ontario sites on grease buildup prevention.
- For extended context, review this replacement schedule overview and Brampton‑specific guidance.
SCU: If you’re juggling multiple sites, rooftop fans, or inspection pressures, partner with a certified team. We handle exchanges, deep cleaning, and records so your managers can focus on guests and operations.
Need a Done‑For‑You Exchange Program?
Our Filter Cleaning & Exchange service keeps your schedule tight and your documentation airtight—without interrupting service. We operate 24/7 across Southern Ontario.
Also explore our complete hood cleaning guide for a full‑system plan.
FAQ
Inspect weekly and exchange every 1–4 weeks based on zone load. Keep spare sets and a simple log. Partner with a certified vendor if you manage multiple hoods, rooftop access, or inspections that demand formal documentation.
- How often should I replace hood filters?
Most busy fry/grill zones need weekly swaps. Mixed a la carte stations run well at every two weeks, while light stations can stretch to three or four weeks with weekly inspections. - What are the signs my filters need changing?
Brown staining, grease drips, smoke roll‑out at the hood edge, and fan strain are clear cues. If two cues show up the same week, swap immediately and reassess your interval. - Do I need spare filters on site?
Yes. Keep 1.5–2.0x your installed filter count. Spares prevent skipped exchanges during rush periods and keep your cadence predictable. - What documentation should I keep?
A weekly zone log with dates, initials, load notes, and photos. File vendor receipts and frequency guidance in the same binder for quick inspector review. - When should I hire a professional?
Bring in a certified partner if you operate multiple kitchens, have rooftop fans, or face recurring smoke/odor issues. You’ll benefit from 24/7 windows and proper NFPA 96 documentation.
Key Takeaways
Set a weekly inspection habit, run zone‑based swap intervals, and maintain labeled spares. Log with photos and pair your routine with certified exchange and deep cleaning to keep airflow steady, reduce fire risk, and pass inspections reliably.
- Inspect weekly; swap every 1–4 weeks by zone.
- Keep 1.5–2.0x spares labeled by zone.
- Use photo logs and vendor reports for compliance.
- Partner for exchanges and deep cleaning when scale grows.