Exhaust fan cleaning is the thorough removal of grease, dust, and debris from commercial kitchen fans, housings, and connected ventilation components. Clean fans move air efficiently, reduce fire risk, and help you pass health and fire inspections. For restaurants across All Over Ontario, routine service keeps kitchens compliant and staff safe.
By Robinhood Cleaners • Last updated: 2026-05-09
Summary
This complete guide explains what exhaust fan cleaning is, why it matters for safety and compliance, and how to execute a professional, step-by-step process. You’ll get best practices, tools, schedules, and Ontario-specific tips—plus examples of how Robinhood Cleaners supports restaurants with certified, 24/7 service.
Restaurant exhaust fans do a lot of heavy lifting. When grease coats blades and housings, airflow drops, noise rises, and hazards grow. In this guide, we unpack standards, methods, and maintenance routines designed for busy commercial kitchens.
- Clear definition of exhaust fan cleaning and system components
- Fire safety and NFPA 96 compliance considerations
- Step-by-step pro workflow with checklists
- Tools, materials, and documentation you’ll need
- Frequency schedules by kitchen type and volume
- Ontario-specific operational tips and examples
Local considerations for All Over Ontario
- Schedule rooftop fan work around rapid weather shifts—wind, rain, and winter ice can affect safe access and containment. Hinge kits and secure tie-offs are essential.
- Plan service windows outside rush periods. Late-night or early-morning appointments help quick service restaurants avoid downtime.
- Verify WSIB coverage and documentation on arrival. Regional inspectors expect proper insurance, tags, and photo reports for kitchen exhaust work.
What is exhaust fan cleaning?
Exhaust fan cleaning is the professional degreasing of a kitchen’s fan assembly, housing, and adjacent duct and hood areas. The goal is to restore airflow (CFM), reduce fire risk, and meet code requirements. Proper cleaning includes disassembly, chemical application, hot-water rinse, reassembly, and verification.
In a commercial kitchen, the fan is the “engine” pulling smoke and vapors through baffle filters, hoods, and ducts. Over time, deposits increase system static pressure and reduce capture efficiency. A single shift can add measurable residue when frying volume is high.
Effective exhaust fan cleaning targets the fan wheel/blades, shroud, drain paths, curb, and the rooftop area beneath the upblast unit. It also addresses surrounding components that influence performance—baffle filters, hood plenum, and the first accessible duct sections. Photo documentation and service tags prove the job was done and support inspections.
For depth on broader system cleaning that complements fan work, see our commercial kitchen exhaust cleaning overview and our exhaust system inspection requirements.
Why exhaust fan cleaning matters
Clean exhaust fans prevent grease fires, stabilize airflow, and reduce noise and vibration. They also help you pass fire and health inspections. Regular service protects your roof from grease discharge and keeps make-up air balanced for staff comfort.
Safety is the headline. Grease is fuel, and hot cooking produces ignition sources. When residue accumulates, the risk rises step by step—from hood to duct to fan. Many inspection failures track back to neglected fan assemblies or missing documentation tags.
- Fire risk reduction: Grease-laden vapors can ignite; clean paths interrupt that chain of risk.
- Performance: Fans that are 10–20% under target CFM can struggle to capture smoke at the cookline, leading to haze and odors.
- Noise and wear: Unbalanced blades add vibration. Excess vibration accelerates bearing and belt wear.
- Roof protection: Containment stops oil from saturating roofing materials and drains.
- Compliance: Inspectors look for current tags, service dates, and photo evidence.
For operators across Southern Ontario, predictable routines matter. We align cleaning with your volume, from quick service fry lines to fine dining sauté. Our team provides 24/7 availability so you can schedule work outside business hours and keep the hood drawing strong when doors open.
How kitchen exhaust fans work
Kitchen exhaust systems capture heat and grease at the hood, move air through baffle filters and ducts, and expel it via a rooftop upblast fan. The fan wheel and motor generate flow (CFM) against system resistance (static pressure), restoring clean air to the kitchen.
Here’s the flow path: cookware releases vapors, the hood captures the plume, baffle filters separate grease, the duct conveys air upward, and the fan discharges it safely above the roofline. Most restaurant rooftops use upblast centrifugal fans designed to throw effluent away from the unit.
- Capture: Hood sizing sets the capture zone; typical overhangs are 6–12 inches beyond appliances.
- Filtration: Stainless baffle filters reduce flame penetration and collect grease in channels.
- Conveyance: Ducts rise vertically where possible to reduce deposition and ease drainage.
- Exhaust: Upblast fans spin at hundreds to over a thousand RPM to maintain target CFM.
- Balance: Make-up air replaces exhausted air to keep the space neutral and comfortable.
When any link weakens—clogged filters, dirty blades, loose belts—airflow drops, smoke hangs, and staff comfort suffers. Monitoring vibration and amp draw against nameplate values helps catch issues before they affect service.
Types, methods, and approaches
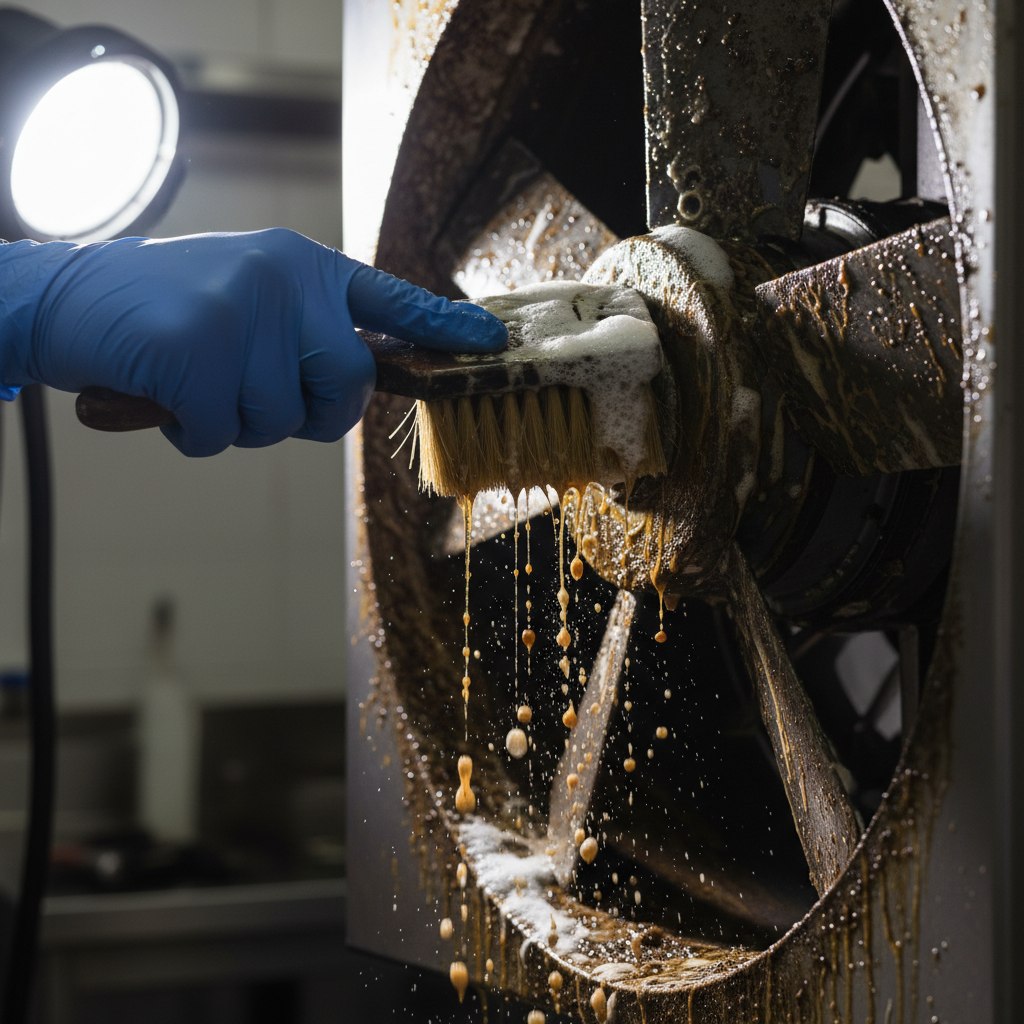
Professional exhaust fan cleaning combines scraping, food-safe degreasers, and hot-water rinsing. Pros choose methods based on buildup, access, and roof protection needs, finishing with neutralization, drying, lubrication checks, and documentation.
Not all kitchens need the same approach. High-volume fryers demand aggressive degreasing more often, while light sauté lines can succeed with steadier, lighter maintenance between deep cleans. The method mix below helps tailor outcomes.
Common cleaning methods
- Hand scraping: Fast removal of thick deposits on blades, shrouds, and curbs.
- Chemical degreasing: Alkaline foam breaks down films in tight geometries.
- Hot-water rinse: Pressure rinse (often 140–180°F) clears softened residues.
- Steam-assisted: Useful on heavy carbon or tight seams when allowed.
- Filter exchange service: Keeps baffles efficient between deep cleans.
Comparison table: methods at a glance
| Method | Best For | Pros | Considerations |
|---|---|---|---|
| Hand scraping | Heavy, caked grease | Immediate impact | Requires follow-up rinse |
| Alkaline degreaser | Film and light buildup | Penetrates seams | Needs proper neutralization |
| Hot-water rinse | Post-chemical clearing | Restores shine | Requires containment |
| Filter exchange | Between deep cleans | Stabilizes airflow | Doesn’t clean ducts/fan |
To explore system-wide options beyond the fan itself, visit our Ontario duct cleaning guide and our odor reduction strategies.
Step-by-step: the professional exhaust fan cleaning process
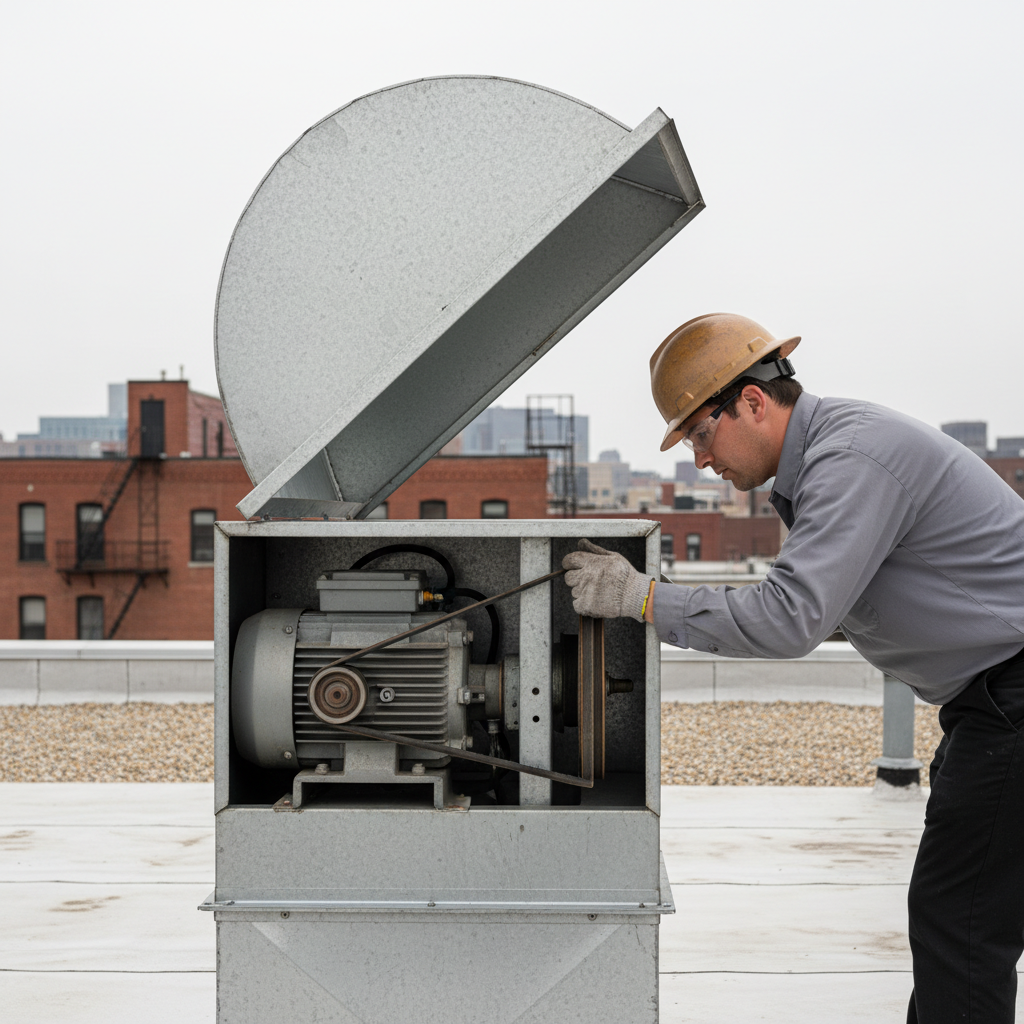
A professional cleaning follows a defined workflow: secure power, set rooftop containment, disassemble and degrease, hot-water rinse, inspect belts and bearings, reassemble with a hinge kit, tag the system, and document photos for compliance. The sequence protects people, property, and results.
Here’s how our team approaches a standard upblast fan on a restaurant rooftop. Your site may vary based on access, curb height, and cooking volume.
- Confirm access and lockout: Secure electrical disconnect and verify makeup air is safe to run or isolate.
- Set containment: Place rooftop mats and a grease containment system to protect roofing.
- Open the fan safely: Use a hinge kit to prevent strain on wiring and allow full access.
- Scrape heavy deposits: Remove bulk grease from the wheel, housing, and curb.
- Apply degreaser: Foam all surfaces and soak per dwell-time guidance.
- Hot-water rinse: Rinse 140–180°F water into containment; avoid overspray.
- Inspect components: Check belt deflection (about 1/2 inch on typical drives), pulley alignment, bearings, and drain paths.
- Reassemble and test: Restore power, confirm rotation, listen for vibration, and verify airflow at the hood.
- Tag and document: Affix service tags with date/time and attach a photo report for your records.
- Finalize cleanup: Remove containment, confirm roof is clean, and walk the site with the manager.
For a deeper scheduling framework to pair with this process, see our maintenance schedule guide.
Process and roles table
| Step | Primary Role | Typical Duration | Key Output |
|---|---|---|---|
| Lockout & setup | Lead tech | 10–20 min | Safe, contained site |
| Scrape & degrease | Team | 30–60 min | Residue removed |
| Rinse & inspect | Lead tech | 20–40 min | Clean, verified fan |
| Reassemble & tag | Lead tech | 10–20 min | Documented service |
Best practices and compliance essentials
The best approach is a documented, tag-and-photo process aligned to NFPA 96 intervals, with grease containment, hinge kits, and safe access. Keep filters clean, belts tensioned, and bearings quiet between deep cleans to maintain airflow and reduce risk.
Compliance isn’t only about the ducts. Inspectors examine the fan housing and surrounding roof for evidence of discharge. They also look for current tags with dates and signatures. Kitchens that manage filters and belts between deep cleans stay stable longer and pass inspections more reliably.
- Intervals: Heavy fry lines often need quarterly or more frequent deep cleaning; lighter-duty operations may extend to semi-annual.
- Access: Hinge kits protect wiring and speed service; access panels aid duct inspection.
- Roof care: Use UL-listed containment to prevent oil migration into roofing.
- Documentation: Keep service reports with photos for one to two years for audit trails.
- Parts checks: Record belt size, bearing condition, and motor amps over time.
For more on certification standards in Ontario, review this outline of NFPA 96 certified hood cleaning and connect it to your inspection calendar.
Tools and resources you’ll need
Successful exhaust fan cleaning uses the right PPE, degreasers, and hot-water rinse equipment, plus rooftop containment and hinge kits. Keep a belt gauge, tension tool, and non-contact tachometer on hand to verify performance before you sign off.
When we outfit a truck for fan work, we plan for both cleaning and preventive maintenance. That way, a squealing belt or warm bearing doesn’t linger until the next visit.
- Safety: Lockout/tagout kit, gloves, eye protection, harness and lifelines for rooftop work.
- Cleaning: Food-safe alkaline degreaser, foamers, scrapers, pads, and 140–180°F rinse.
- Containment: Roof mats, drip pans, absorbents, and UL-listed grease containment.
- Hardware: Hinge kits, weather-resistant fasteners, and replacement baffle filters.
- Verification: Belt deflection gauge, tachometer, clamp meter for motor amps, vibration check.
- Documentation: Tags, timestamped photos, and a simple service checklist.
Need help choosing filter options? See our filter replacement overview and our exhaust cleaning services.
Maintenance schedules and frequency by kitchen type
Match cleaning frequency to cooking volume and grease output. Heavy fryers may need monthly or quarterly deep cleaning; moderate lines can run quarterly to semi-annual; low-volume sites often succeed with semi-annual cycles supported by filter maintenance.
Frequency is a risk equation: more hot oil equals more vaporized grease, which equals faster deposition. Use the table as a starting point and adjust based on hood capture and post-clean inspection results.
| Kitchen Type | Typical Volume | Suggested Deep Clean | Between-Visit Tasks |
|---|---|---|---|
| Quick service frying | High | Monthly–Quarterly | Weekly filter wash/exchange |
| Casual grill/saute | Moderate | Quarterly | Biweekly filter wash |
| Fine dining saute | Moderate–Low | Quarterly–Semi-annual | Monthly filter wash |
| Institutional kitchens | Variable | Quarterly–Semi-annual | Monthly filter wash |
Pair these intervals with system checks. If your hood haze creeps up mid-cycle or cooks complain about heat, shorten the interval. If airflow holds and tags stay current, you’re on track.
Case studies and examples from Ontario
Real kitchens show real results: steady schedules, proper hinge kits, and roof containment reduce rework and inspection stress. Three short examples illustrate how a tailored plan improves airflow, safety, and staff comfort across Southern Ontario.
Quick service burger line (southern region): Fryers drove rapid buildup. We implemented monthly fan and hood deep cleans with weekly filter exchange. Result: haze complaints dropped and fan vibration stabilized after belt alignment and tensioning.
Fine dining sauté kitchen (downtown area): Moderate volume, but late service hours. We scheduled overnight semi-annual deep cleans and instituted a monthly filter wash rotation. Result: quieter operation and fewer odor reports at the front door.
Institutional cafeteria (campus setting): Multiple stations fed one fan. We split the schedule—quarterly deep cleans and biweekly filter service. Result: documented tags and photo reports simplified inspector visits and manager audits.
To map these examples to your site, review our NFPA 96 compliance guide and coordinate dates with your busiest seasons.
Troubleshooting common exhaust fan issues
If airflow drops, listen for belt squeal, feel for vibration, and check filters first. Clean, tension, and align before assuming the motor failed. Persistent issues often trace back to dirty blades, loose belts, or obstructed ducts.
Quick diagnostics
- Weak capture at hood: Clean or swap filters; verify fan rotation and wheel cleanliness.
- Squeal or chirp: Check belt deflection and pulley alignment; look for glazing.
- New vibration: Inspect set-screws and wheel balance; ensure curb gasket is seated.
- Grease on roof: Empty/replace absorbents and verify containment placement.
- Breaker trips: Measure motor amps against nameplate; look for mechanical drag.
When to call a pro
- Repeated belt failures or visible wheel cracks
- Motor overheating or hot bearings
- Missing hinge kit or unsafe rooftop access
- Inspection failures or missing documentation
Need help with a persistent belt issue? See this focused primer on fan belt replacement and coordinate a tension check with your next deep clean.
When to repair, replace, or upgrade
Repair when belts, bearings, or pulleys show wear; replace when wheels crack or housings corrode; upgrade if capacity no longer meets demand. Pair decisions with airflow measurements and service history to avoid guesswork.
Here’s the thing: changing menus and volumes shift your needs. A grill-heavy lineup might become fryer-heavy overnight. If haze grows even after thorough exhaust fan cleaning, review capture, duct resistance, make-up air balance, and fan curve. Your maintenance log helps you decide confidently.
- Repair: Belt and bearing swaps, set-screw tightening, minor drain fixes.
- Replace: Bent wheels, corroded housings, or damaged shafts.
- Upgrade: Larger CFM models, variable-speed drives, or improved containment.
For whole-system implications, explore our system cleaning overview and inspection checklist.
Frequently Asked Questions
These quick answers address common buyer questions about exhaust fan cleaning, scheduling, and compliance. Each response is designed for clarity so managers can make fast, safe decisions for their kitchens.
How often should a commercial kitchen schedule exhaust fan cleaning?
Match frequency to volume. Heavy frying may need monthly or quarterly deep cleaning, while moderate sauté lines can run quarterly to semi-annual. Keep filters clean between visits and track airflow and noise to fine-tune your interval.
What’s included in professional exhaust fan cleaning?
Pros handle lockout, rooftop containment, disassembly, scraping, degreasing, hot-water rinsing, and reassembly. They inspect belts, bearings, and drainage, then tag the system and provide photo documentation so you’re ready for inspections.
How do I know cleaning actually improved airflow?
You’ll notice stronger capture at the hood and less haze. Technicians can also check motor amp draw, belt tension, and wheel cleanliness. Photo reports and steady noise levels are good signs the system is moving air as intended.
Do I need a hinge kit on my rooftop upblast fan?
Yes. Hinge kits allow safe, repeatable access to clean the wheel and housing without straining wiring. They speed service, protect the roof, and help technicians document work thoroughly for your inspection file.
Key takeaways
Exhaust fan cleaning protects people, property, and uptime. Build a schedule that fits your volume, keep filters and belts in shape between visits, and document everything. With the right partner, inspections become predictable and stress-free.
- Grease is fuel—clean fans cut fire risk and stabilize airflow.
- Use hinge kits, containment, and documented tags with photos.
- Adjust frequency to cooking volume and real-world results.
- Pair deep cleans with belt and filter maintenance.
- Choose certified, WSIB-insured teams for safe rooftop work.
Conclusion: turn compliance into a routine
Make exhaust fan cleaning a simple, repeatable process: schedule by volume, verify with photos, and track performance data. This turns inspections into routine check-ins and keeps your kitchen drawing clean air day after day.
For restaurants and foodservice teams across All Over Ontario, the fastest path to consistent results is a calendar-based program supported by filter exchange and mid-cycle checks. We’ve found that when managers can see tagged dates and photo documentation at a glance, fire and health inspections become faster and far less stressful.
Ready to simplify? Our certified technicians handle fan cleaning, hood and duct degreasing, filter cleaning and exchange, and even fan belt replacement guidance. We’re available 24/7 to work around your rush periods, and we bring the right containment to protect your roof on every visit.
Soft CTA: Want a clear, inspection-ready maintenance plan? Let’s map your exhaust fan cleaning schedule and documentation today. Explore our exhaust cleaning services or review inspection requirements to get started.